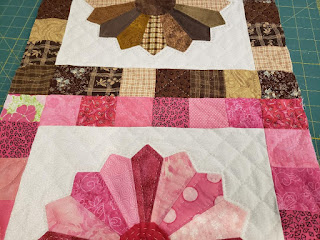
I started with brown and pink. I used the same backing fabric as the pink block (middle one) so it would blend better on the back. I cut two strips 1.5x16.25 inches- one for each side. I put the first one right side up on the cutting mat and placed the brown dresden on top of it. This will be the connector on the back.
Pin so that the strip won't move in the next steps. I like the 1.5 width better than the 1 inch as it gives me more wiggle room for getting it over the sewn part.
Next - pull back the backing and batting 1/4 of an inch or more from the second dresden. I tried to not quilt into the seam allowance when doing that part. Then place right sides together of the dresdens on top of each other, pin and sew 1/4 seam allowance. Yes, I did the whole of the first block (top, batting and backing) unlike other tutorials. I am thinking the 'bump' won't be that noticeable and if it is... I can always trim with scissors!
spread it out and you get this on the back.
I use my herra marker and a ruler to mark a 1/4 inch from the edge.
That marked line.... you can either press or being me and too lazy, I just used the herra marker to 'press' it down so it is a finished edge.
Now fold it over to cover that opening... pull the two apart a bit to snuggle the extra and trim if needed. I kept the little bump and think it won't bother me at all once washed and in use. I used thin hand quilting batting so it should work.
All set for hand stitching that seam with a blind stitch - or however you stitch your binding... which I get to do in car line wait today.
This is what the front looks like - see - you can't even tell it was done as a quilt as you go! I love how this makes things an easier size for me to hand or machine quilt. I don't mind this process.... much better than tugging a huge quilt through my small machine or lugging a big quilt around for quilting.
Yesterday I went over to a friends house and met up with a few friends and we tried a pinterest project. We figured we get a 'fail' but wold have fun anyway. Turns out they all came out pretty good!
This is the photo we used as a guide. A big thanks to her hubby John who tore apart a pallet and sanded 5 boards - one for each of us.
This is mine outside my front door!


You have done a fantastic job on the Dresden Plates. One beautiful quilt coming up✅ Congrats✅
ReplyDeleteThe dresdens will soon be done!
ReplyDeleteWell done with the Welcome sign!